
Are you tired of roasted chickpeas that end up soft, mushy and not crunchy? With oven and air fryer directions, plus 4 variations (salt, spicy, BBQ, sweet granola) this recipe gives you the crunchiest chickpeas ever!
If you're tired of roasted chickpeas that end up being soft and mushy then this recipe is for you.

There is a simple trick that guaranties that you'll always enjoy extra crunchy roasted chickpeas, either you use the oven or the air fryer. But more on this in a few moments.
There are many ways you can prepare this healthy legume. Either from a can or dried and boiled until tender, chickpeas can be easily incorporated into a chickpea and rice salad, made into hummus or cooked as a stew, just like this Moroccan chickpea stew.
In Greece, we like to bake them in a Dutch oven for 3-4 hours until they become soft like butter. This dish is called Revithada (Greek baked chickpeas) and if you haven't tried it you're in for a treat!
The opposite of Revithada is this roasted chickpeas recipe because it produces the crunchiest chickpeas ever! Add them to any salad, like this garlicky kale salad with crispy chickpeas from minimalist baker or this Rainbow power salad with roasted chickpeas from pinch of yum.
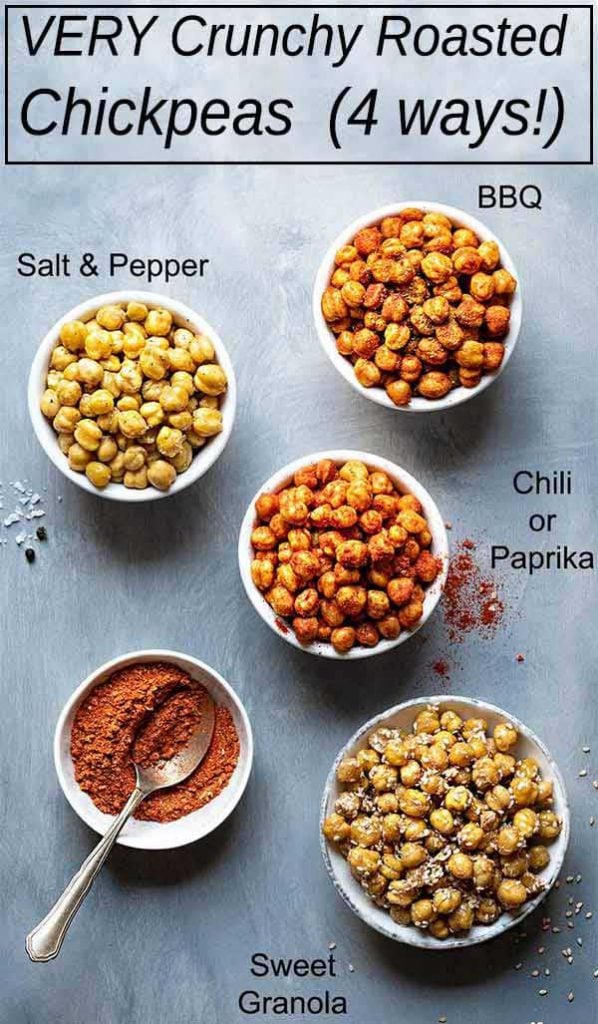
Roasted chickpeas can be flavored in so many ways! You just have to let your imagination free and use the seasonings that you like. This recipe gives you 3 savory and one sweet seasoning ideas that will cover every preference.
Do chickpeas need to be cooked before roasting?
Yes, chickpeas need to be cooked before roasting them in the oven or in the air fryer. If you use chickpeas from a can then they're already cooked.
If you use them dried then you have to soak them overnight in a bowl filled with plenty of water and 1 tablespoon of baking soda. The baking soda helps them to cook more evenly and in shorter time. After soaking, you simmer them in plenty of fresh water until tender.
The trick for really crunchy roasted chickpeas
The secret for achieving very crunchy roasted chickpeas is to roast them twice. It's almost the same philosophy as double fried crispy French fries (allrecipes.com).
During the first roasting, the chickpeas lose most of their moisture and while they cool down they lose some more but without the risk of burning. Once cooled, they get roasted for a second time (in the oven or in the air fryer) until they become really, really crispy.
If you want to store some for another day, you should wait for them to cool completely before transferring them to an airtight container. If you store them in a sealed container while they're still warm, they will become soft due to condensation. Once completely cooled, seal the container very well to protect them from the humidity of the environment.

Roasted chickpeas seasoning
You can add any seasoning you like and as much as you like! Even this dry rub for beef short ribs tastes delicious with these chickpeas.
Just remember not to add the seasoning from the start because it will get burned. Add it one minute before the chickpeas are done, or after they’re done while they’re still hot. Some of my favorite flavors are:
- salt & pepper
- spicy
- BBQ
- sweet granola.
Salt and freshly grated black pepper is my favorite seasoning for roasted chickpeas because it lets the chickpea flavor shine.
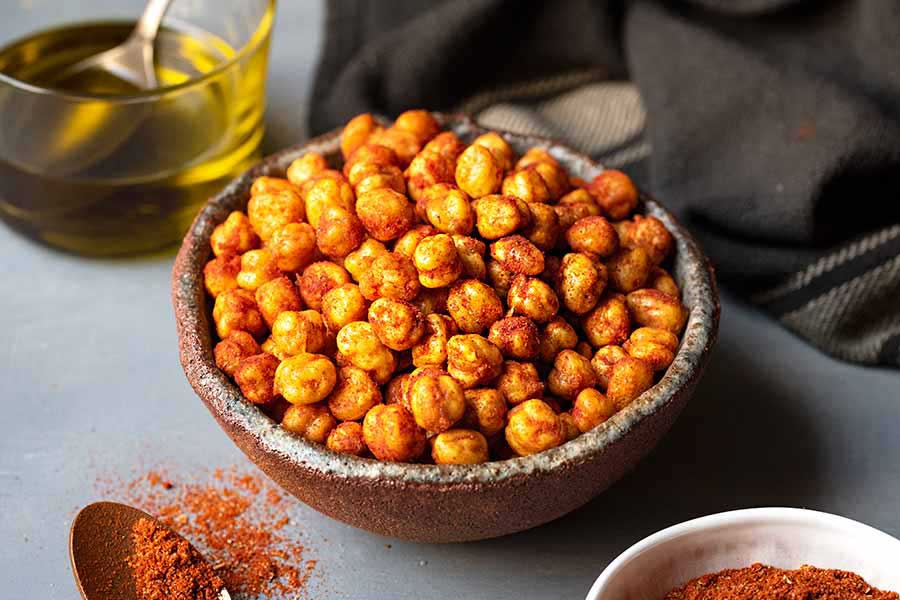
Spicy: If you prefer a spicier seasoning then paprika (sweet or spicy) mixed with some dried garlic and dried onion powder is perfect. You can also use a store bought or this homemade chili seasoning from budget bytes.
BBQ: Those of you who like the smoky BBQ flavor you’ll adore this mixture of brown sugar, smoked paprika, cumin, mustard, dried garlic, pepper and salt.
Sweet granola: If you prefer your roasted chickpeas on the sweet side, you’ll definitely love this “granola” seasoning with honey (or maple syrup for vegans), coconut oil, sesame seeds and cinnamon. For this version I was inspired by my homemade granola (video).
Why are my roasted chickpeas not crunchy?
The most probable reasons why your roasted chickpeas turn out soft are the following:
- You didn’t roast them long enough. Depending on the size and type of chickpeas, some can take longer to roast than others. If they brown too quickly, try roasting them at a lower temperature for a longer time.
- You didn’t roast them twice. Let the chickpeas cool down and roast them for a second time. It makes a difference!
- You didn’t add oil. A small quantity of oil is crucial when we want to achieve crispy, crunchy chickpeas.
- You didn’t dry them with a kitchen paper or towel before transferring them in the oven or the air fryer.
- You didn’t remove the skins. Although you can certainly roast them with their skins, if everything else fails, removing the skins will certainly help.
- You stored them in a container while they were still warm. The condensation is your worst enemy! Let them cool completely before storing them.
- You stored them in a container that’s not airtight. These chickpeas are very thirsty after the double roasting. They will absorb moisture from their environment the first chance they get. So make sure you store them properly.
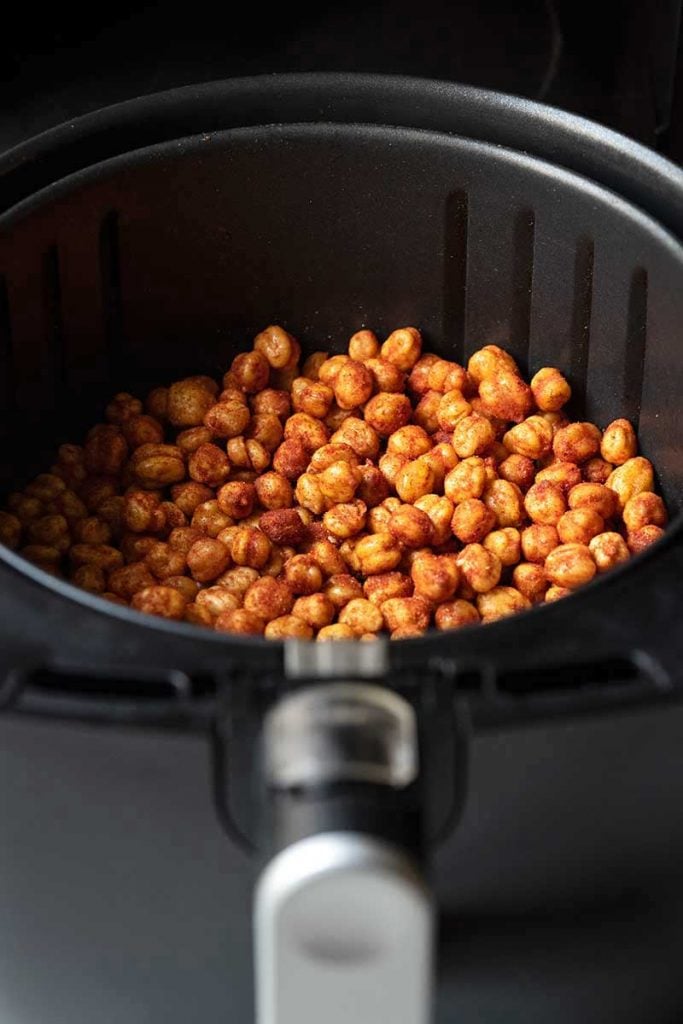
Roasted chickpeas in the oven OR in the air fryer?
Double roasting the chickpeas, either in the oven or in the air fryer, ensures that they'll become as crunchy as it gets. However, the air fryer will give you slightly better results.
On the other hand, in the oven you'll be able to roast a larger quantity of chickpeas, so the choice is yours!
If you're interested in more air fryer recipes you can also check this air fryer salmon and these air fryer Brussels Sprouts with 3 delicious sauces.
Are air fried chickpeas healthy?
Chickpeas are a very healthy food. They are high in vitamins, minerals, fiber and protein. Crispy air fryer chickpeas are the tastiest and crunchiest snack you will find. Using the air fryer cuts the cook time down a bit, and they are crispier than in the oven! Vegan and gluten-free, these crispy roasted chickpeas are an awesome healthy snack for everyone.
Similar recipes you'll love:
- Homemade Falafel (with all the secrets)
- Greek meze platter (appetizer spread)
- How to make Labneh (yogurt cheese)
- How to roast garlic in the oven
📖 Recipe

Roasted chickpeas (oven or air fryer recipe)
Ingredients
- 1 cup cooked chickpeas ((see notes))
- 1 tablespoon olive oil
- The seasoning of your choice ((see notes))
Instructions
Oven directions:
- Preheat your oven to 350°F (175°C) and chose the fan mode if supported.
- Transfer the chickpeas in a colander, rinse them very well and let them drain.Remove any loose skins (optionally you can remove all the skins) and pat them dry with kitchen (or paper) towels.
- Transfer them to a baking pan lined with baking paper and bake for 10 minutes.Remove from the oven, transfer them to a bowl, add the olive oil and mix gently until every chickpea is coated with the oil. Return to the oven and continue baking for another 30 minutes. Stir once during baking.
- Let the chickpeas cool completely and bake for a second time at 390°F (200°C) for 15-20 minutes until very crunchy (optionally you can add 1 teaspoon of olive oil for the second roasting).
- Remove from the oven, add the seasoning and mix to combine. Serve.
- For the sweet granola flavored chickpeas you will bake them for 10 minutes the second time, mix in a bowl with the seasoning and continue baking for another 10 minutes or until the maple syrup has dried.
Air fryer directions:
- Transfer the chickpeas in a colander, rinse them very well and let them drain.Remove any loose skins (optionally you can remove all the skins) and pat them dry with kitchen (or paper) towels.
- Transfer them in a bowl and mix with the olive oil. Set the air fryer temperature to 390°F (200°C) and cook 15 minutes, stopping and stirring them every 4-5 minutes.
- Let the chickpeas cool completely and cook for a second time at the same temperature for another 10 minutes, stirring them twice during cooking.
- Transfer to a bowl and mix with the seasoning of your choice while still hot. Serve.
- For the sweet granola flavored chickpeas you will cook them for 5 minutes the second time, mix them with the seasoning ingredients and continue cooking for 5-8 minutes until the maple syrup has dried. During the second cooking time it's best to use a piece of baking paper or aluminum foil at the bottom of the air fryer bowl, so that the seasoning doesn't leak from the bowl.
Notes
- a pinch of salt
- freshly grated black pepper (¼ to ½ teaspoon or to taste)
- 1 teaspoon paprika (sweet or spicy)
- ½ teaspoon dried onion powder
- ½ teaspoon dried garlic powder
- a pinch of salt
- 1 ½ teaspoons brown sugar
- ½ teaspoon cumin
- ½ teaspoon smoked paprika
- ½ teaspoon garlic powder
- 1 teaspoons onion powder
- ½ teaspoon ground mustard
- a pinch of salt
- 1 teaspoon coconut oil
- 2 tablespoons maple syrup (or honey)
- 1 teaspoon desiccated coconut
- ¼ teaspoon cinnamon
- 2 teaspoons sesame seeds
Nutrition
If you like this recipe, Pin it!

Panos says
I made the honey version and they were delicious!
Julie says
How long do they last stored in an airtight container?
Makos says
Hi Julie,
They will last 3-4 days in an airtight container as long as you let them cool completely before storing them. Also, if you place inside the container a small pouch made from cloth and filled with a couple tablespoons of rice, will help to absorb the extra moisture.